Note
This page was generated from tut//1-Overview//1.1-Bird’s-eye-view-of-Qiskit-Metal.ipynb.
Bird’s eye view of Qiskit Metal#
You’ll use Qiskit Metal in 4 stages#
Choose a design class to instantiate.
Add and modify pre-built components (qubits, coplanar wave guides, etc.) from the QComponent library to your design. (Or, create your own components)
Render to Simulate & Analyze
Current Rendering Options:
Ansys
HFSS Renderer - for high frequency simulations (eigenmode, modal, terminal)
EPR Analysis - Uses eigenmode simulation to perform energy participation ratio analysis
Q3D Renderer - for extracting equivalent circuit values of a layout, such as capacitance
LOM Analysis - Uses the capacitance matrix from Q3D to determine the parameters of a transmon qubit
Render for Fabrication
Current Rendering Options:
GDS
These steps are shown visually below in the following diagram

This tutorial is for steps 1 and 2.#
Using this Tutorial#
Metal can be used three different ways: * Jupyter Notebooks * For interactive code * To Use: 1. Just press run :D * Python scripts * For setting internal breakpoints * To Use: 1. Copy snippets of code from these Notebooks and save as a Python file. 2. Run in your favorite editor. (We like VS Code!) * Metal GUI * In the future, we anticipate Metal GUI to have full functionality. * To Use: 1. You must first use either Jupyter Notebooks or Python Scripts to add components to your QDesign. 2. Use the GUI to visualize and manually edit your components.
Let’s dive in!
QDesign (need-to-know)#
Each time you create a new quantum circuit design, you start by instantiating a QDesign class.
There are different design classes in the design library qiskit_metal.designs for different design layouts. For example the design class DesignPlanar is best for 2D circuit designs.
Every design class (except QDesign) inherits from the base QDesign class. QDesign defines basic functionality for all other design classes and should not be directly instantiated.
QDesign (in-depth)#
QDesign keeps track of each of the components (qubits, coplanar wave guides, etc.) that you add to your circuit and the relationships between them.
As you can see below, QDesign keeps track of many things:

QComponents - do not directly instantiate
Components of your design
Example:
Transmon Qubits
CPWs
etc.
Upon creation, the QComponent’s
makefunction runs and adds the QComponent’s geometries (rectangles, line segments, etc.) to the QGeometryTables
QGeometryTables - instantiate during init of QDesign
Stores backend information about components
Populated when QComponents are added to QDesign
QNet.net_info - instantiate during init of QDesign
Stores backend information on existing connections between components
Instantiated in the backend by QDesign
Populated during connections of QComponents
QRenderer - instantiate during init of QDesign
This is what allows you to export your designs into Ansys, GDS, etc.
qiskit_metal/config.pycontains list of all instantiated renderers
Coding Time!#
Today we’ll be creating a 2D design and adding a single qcomponent
So, let us dive right in. For convenience, let’s begin by enabling automatic reloading of modules when they change.
[1]:
%load_ext autoreload
%autoreload 2
[2]:
import qiskit_metal as metal
from qiskit_metal import designs, draw
from qiskit_metal import MetalGUI, Dict, open_docs

%metal_heading Welcome to Qiskit Metal!
Welcome to Qiskit Metal!
Here, we import the folders designs, draw, MetalGUI, Dict, and open_docs from the qiskit_metal code.
Choose a design layout. We will start with the simple planar QDesign.
[3]:
design = designs.DesignPlanar()
[4]:
# Since we are likely to be making many changes while tuning and modifying our design, we will enable overwriting.
# If you disable the next line, then you will need to delete a component [<component>.delete()] before recreating it.

design.overwrite_enabled = True
[5]:
%metal_heading Hello Quantum World!
Hello Quantum World!
[6]:
# We can also check all of the chip properties to see if we want to change the size or any other parameter.
# By default the name of chip is "main".
design.chips.main
[6]:
{'material': 'silicon',
 'layer_start': '0',
 'layer_end': '2048',
 'size': {'center_x': '0.0mm',
  'center_y': '0.0mm',
  'center_z': '0.0mm',
  'size_x': '9mm',
  'size_y': '6mm',
  'size_z': '-750um',
  'sample_holder_top': '890um',
  'sample_holder_bottom': '1650um'}}
[7]:
design.chips.main.size.size_x = '11mm'
design.chips.main.size.size_y = '9mm'
Launch Qiskit Metal GUI to interactively view, edit, and simulate QDesign: Metal GUI
[8]:
gui = MetalGUI(design)
You can create a ready-made transmon qubit from the QComponent Library, qiskit_metal.qlibrary.qubits. transmon_pocket.py is the file containing our qubit so transmon_pocket is the module we import. The TransmonPocket class is our transmon qubit. Like all quantum components, TransmonPocket inherits from QComponent
Let’s create a new qubit by creating an object of this class.
[9]:
# Select a QComponent to create (The QComponent is a python class named `TransmonPocket`)
from qiskit_metal.qlibrary.qubits.transmon_pocket import TransmonPocket


q1 = TransmonPocket(design, 'Q1', options=dict(connection_pads=dict(a=dict()))) # Create a new Transmon Pocket object with name 'Q1'
gui.rebuild()  # rebuild the design and plot

gui.edit_component('Q1') # set Q1 as the editable component
gui.autoscale() #resize GUI to see QComponent
[10]:
gui.screenshot()
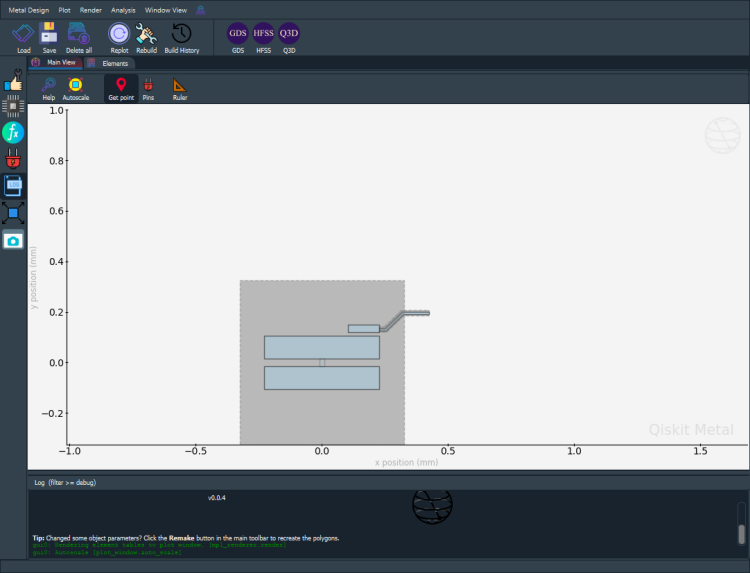
Let’s see what the Q1 object looks like
[11]:
q1 #print Q1 information
[11]:
name:    Q1
class:   TransmonPocket
options:
  'pos_x'             : '0um',
  'pos_y'             : '0um',
  'connection_pads'   : {
       'a'                 : {
            'pad_gap'           : '15um',
            'pad_width'         : '125um',
            'pad_height'        : '30um',
            'pad_cpw_shift'     : '5um',
            'pad_cpw_extent'    : '25um',
            'cpw_width'         : 'cpw_width',
            'cpw_gap'           : 'cpw_gap',
            'cpw_extend'        : '100um',
            'pocket_extent'     : '5um',
            'pocket_rise'       : '65um',
            'loc_W'             : '+1',
            'loc_H'             : '+1',
                             },
                        },
  'chip'              : 'main',
  'pad_gap'           : '30um',
  'inductor_width'    : '20um',
  'pad_width'         : '455um',
  'pad_height'        : '90um',
  'pocket_width'      : '650um',
  'pocket_height'     : '650um',
  'orientation'       : '0',
  'hfss_wire_bonds'   : False,
  'q3d_wire_bonds'    : False,
  'hfss_inductance'   : '10nH',
  'hfss_capacitance'  : 0,
  'hfss_resistance'   : 0,
  'hfss_mesh_kw_jj'   : 7e-06,
  'q3d_inductance'    : '10nH',
  'q3d_capacitance'   : 0,
  'q3d_resistance'    : 0,
  'q3d_mesh_kw_jj'    : 7e-06,
  'gds_cell_name'     : 'my_other_junction',
module:  qiskit_metal.qlibrary.qubits.transmon_pocket
id:      1
What are the default options?#
The QComponent comes with some default options like the length of the pads for our transmon pocket. * Options are parsed internally by Qiskit Metal via the component’s make function. * You can change option parameters from the gui or the script api.
[12]:
%metal_print How do I edit options? API or GUI
You can now use the Metal GUI to edit, plot, and modify quantum components. Equivalently, you can also do everything from the Jupyter Notebooks/Python scripts (which call the Python API directly). The GUI is just calling the Python API for you.
*You must use a string when setting options!
[13]:
# Change options
q1.options.pos_x = '0.5 mm'
q1.options.pos_y = '0.25 mm'
q1.options.pad_height = '225 um'
q1.options.pad_width  = '250 um'
q1.options.pad_gap    = '50 um'
[14]:
gui.rebuild() # Update the component geoemtry, since we changed the options

# Get a list of all the qcomponents in QDesign and then zoom on them.
all_component_names = design.components.keys()

gui.zoom_on_components(all_component_names)

# An alternate way to view within GUI. If want to try it, remove the "#" from the beginning of line.
#gui.autoscale() #resize GUI
[15]:
# gui.main_window.close()
For more information, review the Introduction to Quantum Computing and Quantum Hardware lectures below
|
Lecture Video | Lecture Notes | Lab |
|
Lecture Video | Lecture Notes | Lab |
|
Lecture Video | Lecture Notes | Lab |
|
Lecture Video | Lecture Notes | Lab |
|
Lecture Video | Lecture Notes | Lab |
|
Lecture Video | Lecture Notes | Lab |