Note
இந்தப் பக்கம் docs/tutorials/07_pegasos_qsvc.ipynb இலிருந்து உருவாக்கப்பட்டது.
பெகாசோஸ் குவாண்டம் ஆதரவு திசையன் வகைப்படுத்தி#
There’s another SVM based algorithm that benefits from the quantum kernel method. Here, we introduce an implementation of a another classification algorithm, which is an alternative version to the QSVC available in Qiskit Machine Learning and shown in the "Quantum Kernel Machine Learning" tutorial. This classification algorithm implements the Pegasos algorithm from the paper "Pegasos: Primal Estimated sub-GrAdient SOlver for SVM" by Shalev-Shwartz et al., see:
https://home.ttic.edu/~nati/Publications/PegasosMPB.pdf.
இந்த அல்காரிதம் scikit-learn தொகுப்பிலிருந்து இரட்டை தேர்வுமுறைக்கு மாற்றாகும், கர்னல் தந்திரத்தின் பலன்கள் மற்றும் பயிற்சித் தொகுப்பின் அளவைப் பொருட்படுத்தாமல் பயிற்சி சிக்கலான தன்மையை அளிக்கிறது. எனவே, ``PegasosQSVC` போதுமான பெரிய பயிற்சித் தொகுப்புகளுக்கு QSVC ஐ விட வேகமாகப் பயிற்சியளிக்கும் என எதிர்பார்க்கப்படுகிறது.
அல்காரிதமானது ``QSVC` க்கு நேரடி மாற்றாகச் சில ஹைப்பர்-பாராமீட்டரைசேஷன் மூலம் பயன்படுத்தப்படலாம்.
Let’s generate some data:
[1]:
from sklearn.datasets import make_blobs

# example dataset
features, labels = make_blobs(n_samples=20, n_features=2, centers=2, random_state=3, shuffle=True)
சுழற்சி குறியாக்கத்துடன் பொருந்தக்கூடிய தன்மையை உறுதிசெய்ய நாங்கள் தரவை முன்கூட்டியே செயலாக்குகிறோம் மற்றும் பயிற்சி மற்றும் சோதனை தரவுத்தொகுப்புகளாகப் பிரிக்கிறோம்.
[2]:
import numpy as np

from sklearn.model_selection import train_test_split
from sklearn.preprocessing import MinMaxScaler

features = MinMaxScaler(feature_range=(0, np.pi)).fit_transform(features)

train_features, test_features, train_labels, test_labels = train_test_split(
    features, labels, train_size=15, shuffle=False
)
தரவுத்தொகுப்பில் எங்களிடம் இரண்டு அம்சங்கள் உள்ளன, எனவே தரவுத்தொகுப்பில் உள்ள அம்சங்களின் எண்ணிக்கைக்குப் பல க்யூபிட்களை அமைக்கிறோம்.
பயிற்சியின்போது செய்யப்படும் படிகளின் எண்ணிக்கைக்கு நாம் \(\tau\) அமைக்கிறோம். அல்காரிதத்தில் முன்கூட்டியே நிறுத்துவதற்கான அளவுகோல் எதுவும் இல்லை என்பதை நினைவில் கொள்ளவும். அல்காரிதம் அனைத்து \(\tau\) படிகளிலும் மீண்டும் செயல்படுகிறது.
கடைசியாக ஹைப்பர் பாராமீட்டர் \(C\). இது ஒரு நேர்மறை முறைப்படுத்தல் அளவுரு. முறைப்படுத்தலின் வலிமை \(C`க்கு நேர்மாறான விகிதாசாரமாகும். சிறியது:கணிதம்:`C\) சிறிய எடைகளைத் தூண்டுகிறது, இது பொதுவாக அதிகப் பொருத்தத்தைத் தடுக்க உதவுகிறது. இருப்பினும், இந்த அல்காரிதத்தின் தன்மை காரணமாக, பெரிய \(C\) க்கு சில கணக்கீட்டு படிகள் அற்பமானது. எனவே, பெரிய \(C\) அல்காரிதத்தின் செயல்திறனை கடுமையாக மேம்படுத்துகிறது. அம்ச இடத்தில் தரவு நேரியல் முறையில் பிரிக்கப்பட்டால், \(C\) பெரியதாக இருக்க வேண்டும். பிரிப்பு சரியாக இல்லை என்றால், \(C\) அதிகமாக பொருத்தப்படுவதைத் தடுக்க சிறியதாகத் தேர்ந்தெடுக்க வேண்டும்.
[3]:
# number of qubits is equal to the number of features
num_qubits = 2

# number of steps performed during the training procedure
tau = 100

# regularization parameter
C = 1000
அல்காரிதம் இதைப் பயன்படுத்தி இயங்கும்:
The default fidelity instantiated in
FidelityQuantumKernelZFeatureMapஇலிருந்து உருவாக்கப்பட்ட குவாண்டம் கர்னல்
[4]:
from qiskit import BasicAer
from qiskit.circuit.library import ZFeatureMap
from qiskit_algorithms.utils import algorithm_globals

from qiskit_machine_learning.kernels import FidelityQuantumKernel

algorithm_globals.random_seed = 12345

feature_map = ZFeatureMap(feature_dimension=num_qubits, reps=1)

qkernel = FidelityQuantumKernel(feature_map=feature_map)
PegasosQSVC` செயல்படுத்தல் ``scikit-learn இடைமுகங்களுடன் இணக்கமானது மற்றும் ஒரு மாதிரியைப் பயிற்றுவிப்பதற்கான அழகான நிலையான வழியைக் கொண்டுள்ளது. கன்ஸ்ட்ரக்டரில் நாம் அல்காரிதத்தின் அளவுருக்களை அனுப்புகிறோம், இந்த விஷயத்தில் ஒரு முறைப்படுத்தல் ஹைப்பர்-பாராமீட்டர் \(C\) மற்றும் பல படிகள் உள்ளன.
பிறகு பயிற்சி அம்சங்களையும் லேபிள்களையும் fit முறைக்கு அனுப்புவோம், இது மாதிரிகளுக்குப் பயிற்சி அளித்து, பொருத்தப்பட்ட வகைப்படுத்தியை வழங்கும்.
அதன்பிறகு, சோதனை அம்சங்கள் மற்றும் லேபிள்களைப் பயன்படுத்தி எங்கள் மாதிரியை நாங்கள் ஸ்கோர் செய்கிறோம்.
[5]:
from qiskit_machine_learning.algorithms import PegasosQSVC

pegasos_qsvc = PegasosQSVC(quantum_kernel=qkernel, C=C, num_steps=tau)

# training
pegasos_qsvc.fit(train_features, train_labels)

# testing
pegasos_score = pegasos_qsvc.score(test_features, test_labels)
print(f"PegasosQSVC classification test score: {pegasos_score}")
PegasosQSVC classification test score: 1.0
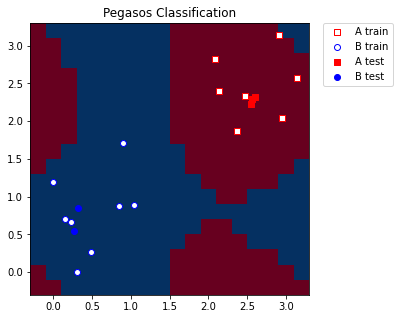
காட்சிப்படுத்தல் நோக்கங்களுக்காக, MinMaxScaler இல் நாங்கள் பயன்படுத்திய குறைந்தபட்ச மற்றும் அதிகபட்ச மதிப்புகளைக் கொண்ட முன் வரையறுக்கப்பட்ட படியின் மெஷ் கட்டத்தை உருவாக்குகிறோம். பயிற்சி மற்றும் சோதனை மாதிரிகளின் சிறந்த பிரதிநிதித்துவத்திற்காக கட்டத்திற்கு சில விளிம்புகளையும் சேர்க்கிறோம்.
[6]:
grid_step = 0.2
margin = 0.2
grid_x, grid_y = np.meshgrid(
    np.arange(-margin, np.pi + margin, grid_step), np.arange(-margin, np.pi + margin, grid_step)
)
கட்டத்தை மாதிரியுடன் இணக்கமான வடிவத்திற்கு மாற்றுகிறோம், வடிவம் (n_samples, n_features) ஆக இருக்க வேண்டும். ஒவ்வொரு கட்டப் புள்ளிக்கும் நாம் ஒரு லேபிளைக் கணிக்கிறோம். எங்கள் விஷயத்தில் கணித்த லேபிள்கள் கட்டத்தை வண்ணமயமாக்க பயன்படுத்தப்படும்.
[7]:
meshgrid_features = np.column_stack((grid_x.ravel(), grid_y.ravel()))
meshgrid_colors = pegasos_qsvc.predict(meshgrid_features)
இறுதியாக, மாதிரியிலிருந்து நாம் பெற்ற லேபிள்கள்/வண்ணங்களின்படி எங்கள் கட்டத்தை நாங்கள் திட்டமிடுகிறோம். நாங்கள் பயிற்சி மற்றும் சோதனை மாதிரிகளையும் திட்டமிடுகிறோம்.
[8]:
import matplotlib.pyplot as plt

plt.figure(figsize=(5, 5))
meshgrid_colors = meshgrid_colors.reshape(grid_x.shape)
plt.pcolormesh(grid_x, grid_y, meshgrid_colors, cmap="RdBu", shading="auto")

plt.scatter(
    train_features[:, 0][train_labels == 0],
    train_features[:, 1][train_labels == 0],
    marker="s",
    facecolors="w",
    edgecolors="r",
    label="A train",
)
plt.scatter(
    train_features[:, 0][train_labels == 1],
    train_features[:, 1][train_labels == 1],
    marker="o",
    facecolors="w",
    edgecolors="b",
    label="B train",
)

plt.scatter(
    test_features[:, 0][test_labels == 0],
    test_features[:, 1][test_labels == 0],
    marker="s",
    facecolors="r",
    edgecolors="r",
    label="A test",
)
plt.scatter(
    test_features[:, 0][test_labels == 1],
    test_features[:, 1][test_labels == 1],
    marker="o",
    facecolors="b",
    edgecolors="b",
    label="B test",
)

plt.legend(bbox_to_anchor=(1.05, 1), loc="upper left", borderaxespad=0.0)
plt.title("Pegasos Classification")
plt.show()
[9]:
import qiskit.tools.jupyter

%qiskit_version_table
%qiskit_copyright
Version Information
| Qiskit Software | Version |
|---|---|
qiskit-terra | 0.22.0 |
qiskit-aer | 0.11.0 |
qiskit-ignis | 0.7.0 |
qiskit | 0.33.0 |
qiskit-machine-learning | 0.5.0 |
| System information | |
| Python version | 3.7.9 |
| Python compiler | MSC v.1916 64 bit (AMD64) |
| Python build | default, Aug 31 2020 17:10:11 |
| OS | Windows |
| CPUs | 4 |
| Memory (Gb) | 31.837730407714844 |
| Thu Oct 13 10:42:49 2022 GMT Daylight Time | |
This code is a part of Qiskit
© Copyright IBM 2017, 2022.
This code is licensed under the Apache License, Version 2.0. You may
obtain a copy of this license in the LICENSE.txt file in the root directory
of this source tree or at http://www.apache.org/licenses/LICENSE-2.0.
Any modifications or derivative works of this code must retain this
copyright notice, and modified files need to carry a notice indicating
that they have been altered from the originals.